> ## Documentation Index
> Fetch the complete documentation index at: https://apidocs.neetoengage.com/llms.txt
> Use this file to discover all available pages before exploring further.
# Connect agent
> Step-by-step setup for Claude, ChatGPT, and other AI agents.
## Sign in with your NeetoEngage account
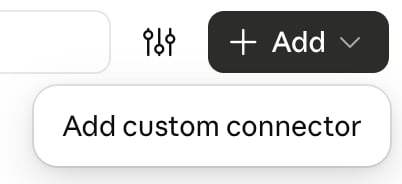
1. Open **[Customize > Connectors](https://claude.ai/customize/connectors)**, click **Add**, then click **Add custom connector**.
 2. Enter the name NeetoEngage and paste the server URL:
```
https://connect.neetoengage.com/mcp/messages
```
3. Click **Continue** and sign in to NeetoEngage. See [What the sign-in looks like](#what-the-sign-in-looks-like).
NeetoEngage then works in claude.ai, the Claude desktop app, Claude mobile, and Cowork.
If you do not see **Add custom connector**, your Team plan admin must allow custom connectors under **[Organization settings > Connectors](https://claude.ai/admin-settings/connectors)**.
To disconnect, open **[Customize > Connectors](https://claude.ai/customize/connectors)** and remove NeetoEngage.
1. Go to [chatgpt.com](https://chatgpt.com) and open **Settings → Security and login**.
2. Scroll to the bottom of the page and turn on **Developer mode**. It is below **Lockdown mode**.
2. Enter the name NeetoEngage and paste the server URL:
```
https://connect.neetoengage.com/mcp/messages
```
3. Click **Continue** and sign in to NeetoEngage. See [What the sign-in looks like](#what-the-sign-in-looks-like).
NeetoEngage then works in claude.ai, the Claude desktop app, Claude mobile, and Cowork.
If you do not see **Add custom connector**, your Team plan admin must allow custom connectors under **[Organization settings > Connectors](https://claude.ai/admin-settings/connectors)**.
To disconnect, open **[Customize > Connectors](https://claude.ai/customize/connectors)** and remove NeetoEngage.
1. Go to [chatgpt.com](https://chatgpt.com) and open **Settings → Security and login**.
2. Scroll to the bottom of the page and turn on **Developer mode**. It is below **Lockdown mode**.
 ChatGPT does not allow **Lockdown mode** and **Developer mode** at the same time. If **Lockdown mode** is on, turn it off first. If you still do not see **Developer mode**, your ChatGPT workspace admin has turned it off. Ask them to allow it.
3. Go to [chatgpt.com/plugins](https://chatgpt.com/plugins) and click the **plus** button.
4. In **New Plugin**, enter the name NeetoEngage, set **Connection** to **Server URL**, and paste:
```
https://connect.neetoengage.com/mcp/messages
```
5. Leave **Authentication** on **OAuth**.
6. Tick **I understand and want to continue**, then click **Create**.
7. Sign in to NeetoEngage. See [What the sign-in looks like](#what-the-sign-in-looks-like).
The desktop app does not need **Developer mode**.
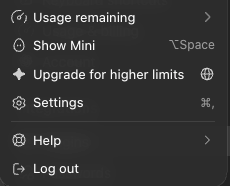
1. Click your profile picture at the bottom left, then click **Settings**.
ChatGPT does not allow **Lockdown mode** and **Developer mode** at the same time. If **Lockdown mode** is on, turn it off first. If you still do not see **Developer mode**, your ChatGPT workspace admin has turned it off. Ask them to allow it.
3. Go to [chatgpt.com/plugins](https://chatgpt.com/plugins) and click the **plus** button.
4. In **New Plugin**, enter the name NeetoEngage, set **Connection** to **Server URL**, and paste:
```
https://connect.neetoengage.com/mcp/messages
```
5. Leave **Authentication** on **OAuth**.
6. Tick **I understand and want to continue**, then click **Create**.
7. Sign in to NeetoEngage. See [What the sign-in looks like](#what-the-sign-in-looks-like).
The desktop app does not need **Developer mode**.
1. Click your profile picture at the bottom left, then click **Settings**.
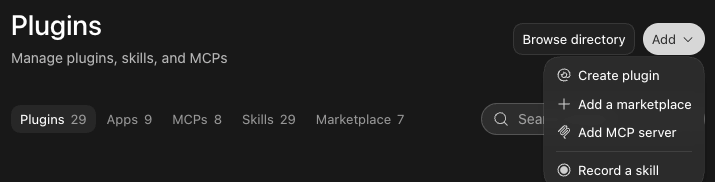
 2. Click **Plugins**. Click **Add**, then click **Add MCP server**.
 3. Enter the name NeetoEngage and set **Type** to **Streamable HTTP**.
4. In **URL**, paste:
```
https://connect.neetoengage.com/mcp/messages
```
5. Leave the other fields empty and click **Save**.
6. Click the **MCPs** tab. Next to **neetoengage**, click **Authenticate**.
7. Sign in to NeetoEngage. See [What the sign-in looks like](#what-the-sign-in-looks-like).
1. Add the server:
```bash theme={"system"}
claude mcp add --transport http neetoengage https://connect.neetoengage.com/mcp/messages
```
2. Start Claude Code and run `/mcp`.
3. Pick **neetoengage** and sign in to NeetoEngage in the browser.
1. Add the server to `~/.cursor/mcp.json`:
```json theme={"system"}
{
"mcpServers": {
"neetoengage": {
"url": "https://connect.neetoengage.com/mcp/messages"
}
}
}
```
2. Restart Cursor.
3. Sign in to NeetoEngage when Cursor asks.
1. Add the server to `~/.gemini/settings.json`. Use `httpUrl`, not `url`:
```json theme={"system"}
{
"mcpServers": {
"neetoengage": {
"httpUrl": "https://connect.neetoengage.com/mcp/messages"
}
}
}
```
2. Start Gemini CLI and sign in to NeetoEngage when it asks.
1. Add the server to `~/.codex/config.toml`:
```toml theme={"system"}
[mcp_servers.neetoengage]
url = "https://connect.neetoengage.com/mcp/messages"
```
2. Run this command and sign in to NeetoEngage in the browser:
```bash theme={"system"}
codex mcp login neetoengage
```
You need VS Code 1.99 or later, with GitHub Copilot in **Agent** mode.
1. Create `.vscode/mcp.json` in your workspace. Use `servers`, not `mcpServers`:
```json theme={"system"}
{
"servers": {
"neetoengage": {
"type": "http",
"url": "https://connect.neetoengage.com/mcp/messages"
}
}
}
```
2. Sign in to NeetoEngage when VS Code asks.
1. Add the server to `~/.codeium/windsurf/mcp_config.json`. Use `serverUrl`, not `url`:
```json theme={"system"}
{
"mcpServers": {
"neetoengage": {
"serverUrl": "https://connect.neetoengage.com/mcp/messages"
}
}
}
```
2. Turn on the server under **Settings → Cascade → MCP Servers**.
3. Sign in to NeetoEngage when Windsurf asks.
### What the sign-in looks like
Enter your workspace subdomain, or paste your workspace URL. For `acme.neetoengage.com`, enter `acme`. If you do not know it, select **Find your workspace subdomain** on that screen. It opens the [Workspace subdomain](/mcp/workspace-subdomain) page.
Sign in to that workspace, if you are not signed in already.
**Read** and **Stay connected** are always on. Tick **Create and update** and **Delete** only if the assistant needs them.
One connection can reach more than one workspace at the same time. The workspace you entered is always connected. If your email belongs to other workspaces, tick any you also want under **Additional workspaces to connect**. The permissions you approve apply to all of them.
Click **Authorize**.
To add a workspace or a permission later, sign in again and tick it.
## Use an API key
An API key reaches the whole workspace, not only what you can see. Use it for automation. See [Authentication](/mcp/authentication).
1. Add the server to `~/.claude.json`:
```json theme={"system"}
{
"mcpServers": {
"neetoengage": {
"type": "http",
"url": "https://connect.neetoengage.com/mcp/messages",
"headers": {
"Authorization": "Bearer YOUR_API_KEY"
}
}
}
}
```
2. Restart Claude Code.
1. Add the server to `~/.cursor/mcp.json`:
```json theme={"system"}
{
"mcpServers": {
"neetoengage": {
"type": "http",
"url": "https://connect.neetoengage.com/mcp/messages",
"headers": {
"Authorization": "Bearer YOUR_API_KEY"
}
}
}
}
```
2. Restart Cursor.
1. Add the server to `~/.gemini/settings.json`. Use `httpUrl`, not `url`:
```json theme={"system"}
{
"mcpServers": {
"neetoengage": {
"httpUrl": "https://connect.neetoengage.com/mcp/messages",
"headers": {
"Authorization": "Bearer YOUR_API_KEY"
}
}
}
}
```
2. Restart Gemini CLI.
1. Add the server to `~/.codex/config.toml`:
```toml theme={"system"}
[mcp_servers.neetoengage]
url = "https://connect.neetoengage.com/mcp/messages"
bearer_token_env_var = "NEETOENGAGE_API_KEY"
```
2. Set `NEETOENGAGE_API_KEY` to your API key in the shell where you run Codex.
You need VS Code 1.99 or later, with GitHub Copilot in **Agent** mode.
1. Create `.vscode/mcp.json` in your workspace:
```json theme={"system"}
{
"inputs": [
{
"type": "promptString",
"id": "neetoengage-api-key",
"description": "NeetoEngage API key",
"password": true
}
],
"servers": {
"neetoengage": {
"type": "http",
"url": "https://connect.neetoengage.com/mcp/messages",
"headers": {
"Authorization": "Bearer ${input:neetoengage-api-key}"
}
}
}
}
```
2. Paste your API key when VS Code asks.
This file lives in your project. Do not paste the key into the file itself, or it can end up in a commit.
1. Add the server to `~/.codeium/windsurf/mcp_config.json`. Use `serverUrl`, not `url`:
```json theme={"system"}
{
"mcpServers": {
"neetoengage": {
"serverUrl": "https://connect.neetoengage.com/mcp/messages",
"headers": {
"Authorization": "Bearer YOUR_API_KEY"
}
}
}
}
```
2. Turn on the server under **Settings → Cascade → MCP Servers**.
1. Open **Settings → Customizations → Open MCP Config**.
2. Add the server to `mcp_config.json`. Use `serverUrl`, not `url`:
```json theme={"system"}
{
"mcpServers": {
"neetoengage": {
"serverUrl": "https://connect.neetoengage.com/mcp/messages",
"headers": {
"Authorization": "Bearer YOUR_API_KEY"
}
}
}
}
```
3. Reload Antigravity.
Replace `YOUR_API_KEY` with a key from your workspace. [Learn how to generate your API key.](/api/authentication)
## Confirm the connection
Ask the assistant *"List the tracks in my NeetoEngage workspace."* If it answers with your tracks, the connection works. For more prompts, see [Examples](/mcp/examples). If it does not work, see [Troubleshooting](/mcp/troubleshooting).
This documentation is built and hosted on [Mintlify](https://mintlify.com), a developer documentation platform.
3. Enter the name NeetoEngage and set **Type** to **Streamable HTTP**.
4. In **URL**, paste:
```
https://connect.neetoengage.com/mcp/messages
```
5. Leave the other fields empty and click **Save**.
6. Click the **MCPs** tab. Next to **neetoengage**, click **Authenticate**.
7. Sign in to NeetoEngage. See [What the sign-in looks like](#what-the-sign-in-looks-like).
1. Add the server:
```bash theme={"system"}
claude mcp add --transport http neetoengage https://connect.neetoengage.com/mcp/messages
```
2. Start Claude Code and run `/mcp`.
3. Pick **neetoengage** and sign in to NeetoEngage in the browser.
1. Add the server to `~/.cursor/mcp.json`:
```json theme={"system"}
{
"mcpServers": {
"neetoengage": {
"url": "https://connect.neetoengage.com/mcp/messages"
}
}
}
```
2. Restart Cursor.
3. Sign in to NeetoEngage when Cursor asks.
1. Add the server to `~/.gemini/settings.json`. Use `httpUrl`, not `url`:
```json theme={"system"}
{
"mcpServers": {
"neetoengage": {
"httpUrl": "https://connect.neetoengage.com/mcp/messages"
}
}
}
```
2. Start Gemini CLI and sign in to NeetoEngage when it asks.
1. Add the server to `~/.codex/config.toml`:
```toml theme={"system"}
[mcp_servers.neetoengage]
url = "https://connect.neetoengage.com/mcp/messages"
```
2. Run this command and sign in to NeetoEngage in the browser:
```bash theme={"system"}
codex mcp login neetoengage
```
You need VS Code 1.99 or later, with GitHub Copilot in **Agent** mode.
1. Create `.vscode/mcp.json` in your workspace. Use `servers`, not `mcpServers`:
```json theme={"system"}
{
"servers": {
"neetoengage": {
"type": "http",
"url": "https://connect.neetoengage.com/mcp/messages"
}
}
}
```
2. Sign in to NeetoEngage when VS Code asks.
1. Add the server to `~/.codeium/windsurf/mcp_config.json`. Use `serverUrl`, not `url`:
```json theme={"system"}
{
"mcpServers": {
"neetoengage": {
"serverUrl": "https://connect.neetoengage.com/mcp/messages"
}
}
}
```
2. Turn on the server under **Settings → Cascade → MCP Servers**.
3. Sign in to NeetoEngage when Windsurf asks.
### What the sign-in looks like
Enter your workspace subdomain, or paste your workspace URL. For `acme.neetoengage.com`, enter `acme`. If you do not know it, select **Find your workspace subdomain** on that screen. It opens the [Workspace subdomain](/mcp/workspace-subdomain) page.
Sign in to that workspace, if you are not signed in already.
**Read** and **Stay connected** are always on. Tick **Create and update** and **Delete** only if the assistant needs them.
One connection can reach more than one workspace at the same time. The workspace you entered is always connected. If your email belongs to other workspaces, tick any you also want under **Additional workspaces to connect**. The permissions you approve apply to all of them.
Click **Authorize**.
To add a workspace or a permission later, sign in again and tick it.
## Use an API key
An API key reaches the whole workspace, not only what you can see. Use it for automation. See [Authentication](/mcp/authentication).
1. Add the server to `~/.claude.json`:
```json theme={"system"}
{
"mcpServers": {
"neetoengage": {
"type": "http",
"url": "https://connect.neetoengage.com/mcp/messages",
"headers": {
"Authorization": "Bearer YOUR_API_KEY"
}
}
}
}
```
2. Restart Claude Code.
1. Add the server to `~/.cursor/mcp.json`:
```json theme={"system"}
{
"mcpServers": {
"neetoengage": {
"type": "http",
"url": "https://connect.neetoengage.com/mcp/messages",
"headers": {
"Authorization": "Bearer YOUR_API_KEY"
}
}
}
}
```
2. Restart Cursor.
1. Add the server to `~/.gemini/settings.json`. Use `httpUrl`, not `url`:
```json theme={"system"}
{
"mcpServers": {
"neetoengage": {
"httpUrl": "https://connect.neetoengage.com/mcp/messages",
"headers": {
"Authorization": "Bearer YOUR_API_KEY"
}
}
}
}
```
2. Restart Gemini CLI.
1. Add the server to `~/.codex/config.toml`:
```toml theme={"system"}
[mcp_servers.neetoengage]
url = "https://connect.neetoengage.com/mcp/messages"
bearer_token_env_var = "NEETOENGAGE_API_KEY"
```
2. Set `NEETOENGAGE_API_KEY` to your API key in the shell where you run Codex.
You need VS Code 1.99 or later, with GitHub Copilot in **Agent** mode.
1. Create `.vscode/mcp.json` in your workspace:
```json theme={"system"}
{
"inputs": [
{
"type": "promptString",
"id": "neetoengage-api-key",
"description": "NeetoEngage API key",
"password": true
}
],
"servers": {
"neetoengage": {
"type": "http",
"url": "https://connect.neetoengage.com/mcp/messages",
"headers": {
"Authorization": "Bearer ${input:neetoengage-api-key}"
}
}
}
}
```
2. Paste your API key when VS Code asks.
This file lives in your project. Do not paste the key into the file itself, or it can end up in a commit.
1. Add the server to `~/.codeium/windsurf/mcp_config.json`. Use `serverUrl`, not `url`:
```json theme={"system"}
{
"mcpServers": {
"neetoengage": {
"serverUrl": "https://connect.neetoengage.com/mcp/messages",
"headers": {
"Authorization": "Bearer YOUR_API_KEY"
}
}
}
}
```
2. Turn on the server under **Settings → Cascade → MCP Servers**.
1. Open **Settings → Customizations → Open MCP Config**.
2. Add the server to `mcp_config.json`. Use `serverUrl`, not `url`:
```json theme={"system"}
{
"mcpServers": {
"neetoengage": {
"serverUrl": "https://connect.neetoengage.com/mcp/messages",
"headers": {
"Authorization": "Bearer YOUR_API_KEY"
}
}
}
}
```
3. Reload Antigravity.
Replace `YOUR_API_KEY` with a key from your workspace. [Learn how to generate your API key.](/api/authentication)
## Confirm the connection
Ask the assistant *"List the tracks in my NeetoEngage workspace."* If it answers with your tracks, the connection works. For more prompts, see [Examples](/mcp/examples). If it does not work, see [Troubleshooting](/mcp/troubleshooting).
This documentation is built and hosted on [Mintlify](https://mintlify.com), a developer documentation platform.